Porting Godot Games To Rust (Part 1)
NOTE This guide has become obsolete. Unfortunately (for me) godot-rust came out with version 0.9-preview shortly after I wrote this blog, and large chunks of this blog are just plain..wrong. You can see 0.9 compatible code here: https://github.com/paytonrules/AirCombat - as I updated the code itself. Unfortunately though the tutorial before has quite a few obsolete ways of doing things, including all the unsafe code.
Of course if you're using 0.8 of godot-rust the tutorial is still right, but Part 2 is not going to happen because sadly I was about 50% complete when the new godot-rust was released.
This guide is for people who are interested using Rust with the Godot game engine, but found the API docs to be too abstract to follow along, and the existing tutorials too shallow to accomplish much. By the end you'll be running this same game:
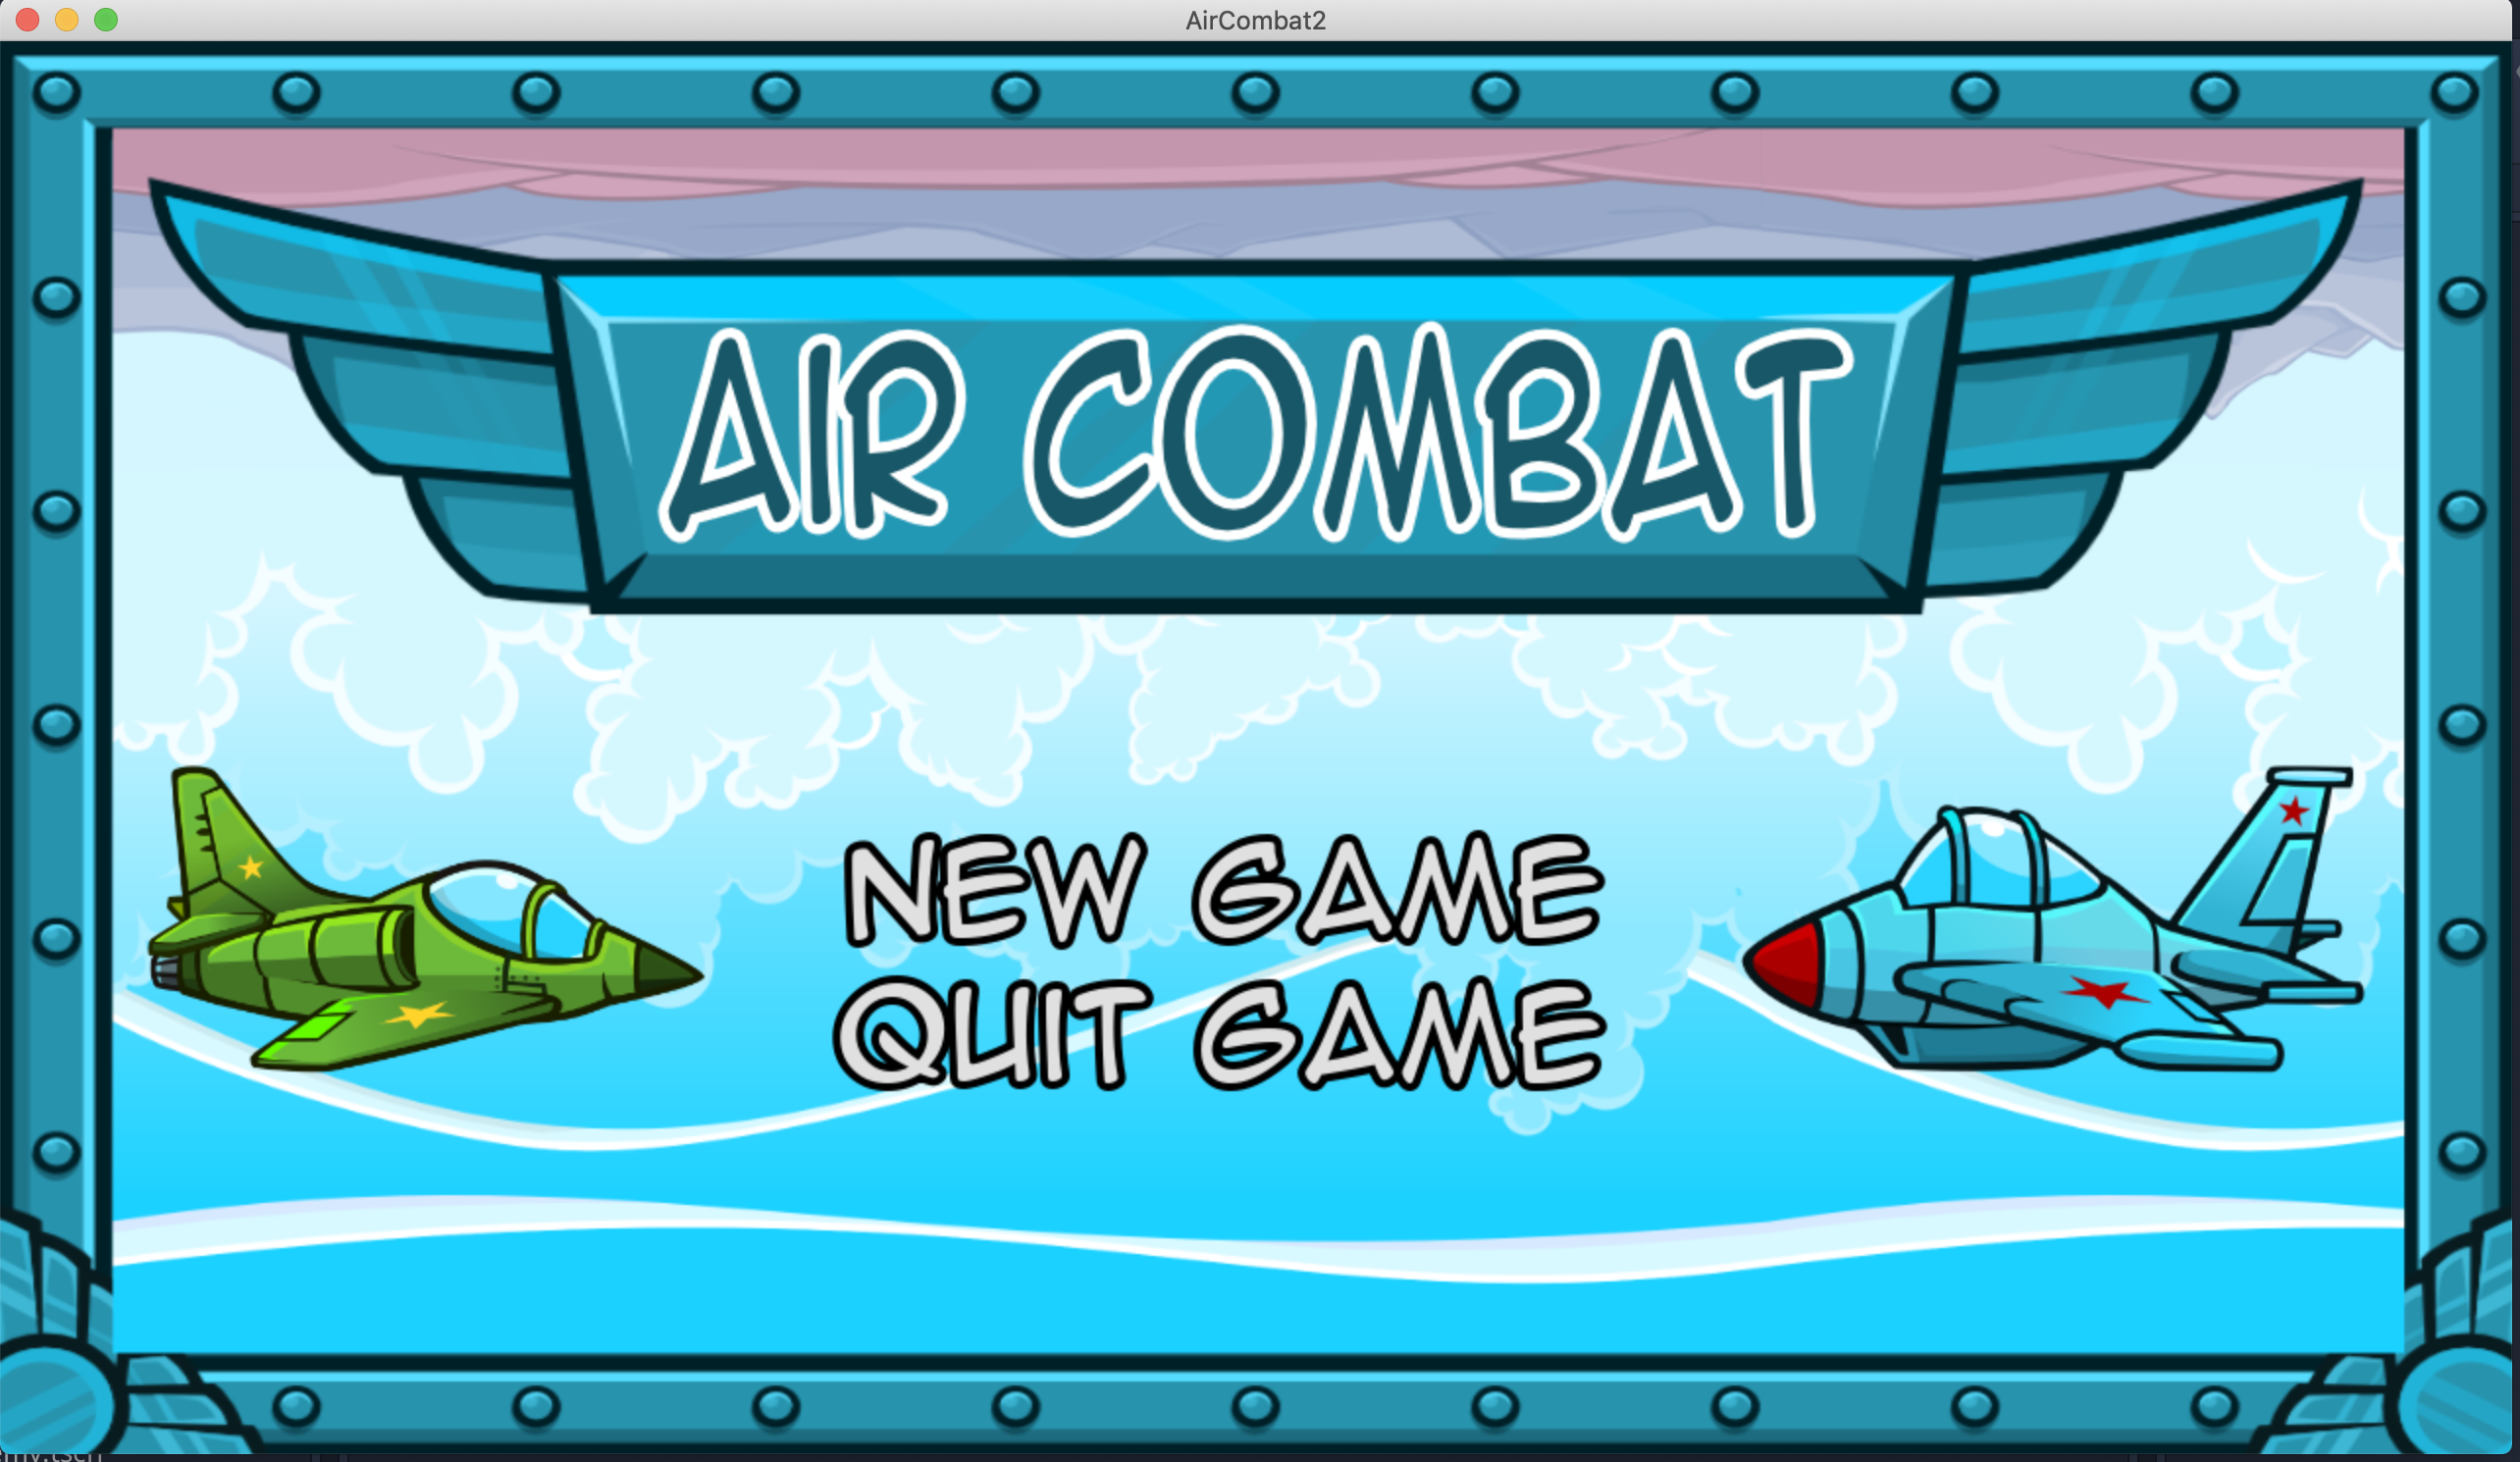
..only in Rust. The final version is here, but spoilers.
The game is this Godot 2D tutorial from devga.me, ported from GDScript. To follow along I recommend you either first follow the original tutorial, or if you're already familiar with Godot and GDScript then grab the original code. I won't be stepping through each bit of the original tutorial, as I don't want to copy the original work, instead I'll start with the finished version tell you how I replaced GDScript with Rust. This should help new users of godot-rust get over some of the hurdles to using this uncommon stack.
Prerequisites
In order to follow along you'll need to original source from the tutorial, as well as Godot installed. I used version 3.2 when I wrote this. You'll of course also need Rust, but if you are coming to this tutorial with no Rust knowledge I recommend working through at least some of The Rust Book before trying to follow this.
About godot-rust
To write Godot games in Rust you'll be using GDNative - which is a module for Godot that allows you to write your code in a complied library instead of its built-in GDScript language. Originally meant for using C/C++ this makes Rust an excellent candidate as an alternative language. However all GDNative does is call into your Rust library - in order to actually do anything you'll need the godot-rust bindings. The Rust bindings mostly provide a mapping from Godot classes to Rust structures, with a few notable exceptions which I'll touch on as we go through the article.
To reiterate Godot is our game engine, GDNative is the feature of Godot that allows you to use native code instead of GDScript, and godot-rust is the library you use to "talk" to Godot in Rust. I found that confusing a few times.
Creating your Rust library
I'm going to assume you have the AirCombat game from the tutorial above in some directory on your machine. To create your Rust library go ahead and use cargo in the root directory:
$ cargo new --lib src/air_combat
This probably isn't how I'll structure my next Godot/Rust project (everything could be under src) but it's how I did this one if you're following along. Next you'll need to update the config.toml as specified in the godot-rust README:
[dependencies]
gdnative = "0.8"

[lib]
crate-type = ["cdylib"]
Make sure you double-check with the README - version numbers have a habit of changing and blog posts don't. Before you can build the library you'll have to make sure you have one more dependency installed, bindgen, which I was able to do by using brew install llvm but you should check the directions for your system.
That done you can now build your library where the game logic will go, with cargo build. You can run that now.
Adding your library to Godot
One thing that tripped me for a long while was making sure my Godot game could actually find my Rust library. It's a two-step process. As a first step you need to create a GDNativeLibrary resource that's linked to your built library. In Godot add a New Resource in the FileSystem window.
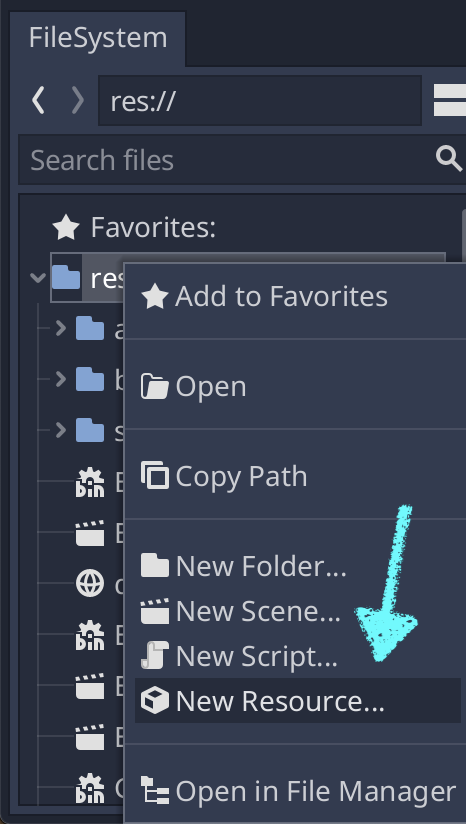
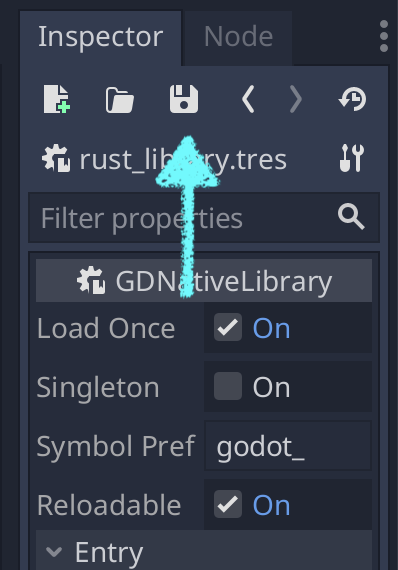
Choose a GDNativeLibrary and give it the name rust_library.tres (to match what I have). Select it in the FileSystem after you create it, and you should see the Platform window appear on the bottom of the screen. Add your built library by finding your platform (for me this is MacOSX, 64 bit) and clicking the little file-system icon. Browse to where the built rust target is, it should be in src/air_combat/target/debug/, and choose the library built for your platform. For me (OSX) it's libair_combat.dylib.

WARNING You aren't done yet. After selecting the library you need to make sure to save the resource in the inspector. Otherwise you haven't updated the resource with the link. It's an easy thing to miss, and will leave you confused when your Rust code isn't being called.
Your First Rust Script
Godot programs attach scripts to nodes to customize behavior. The term script sounds a little weird when we're using a compiled library, but it's the best one we have to fit in with Godot. What we've done is attach a library to our Godot program that makes Rusts code available, but we haven't attached anything. Now we're going to start with that.
The godot-rust README and this tutorial both start with "Hello World" but we're not going to do that, after all you could just follow those other tutorials. Were going to start by taking globals.rd and moving it to a Rust struct. Given the small size of `globals` this should theoretically be easy:
extends Node

var currentStage = 1
var kills = 0
This tiny script is actually going to have to force us to learn a lot of things:
- How to export a Rust struct as a GDNative script
- How to call Rust from GDScript
- How to put Rust classes in the AutoLoad
Creating a NativeScript Resource
Let's start by making a NativeScript resource - the NativeScript resource is the bridge from Godot to Rust code. It's easy to forget this step, leaving you with working code that isn't called, so I try to do it first. Again create a new resource in FileSystem window:
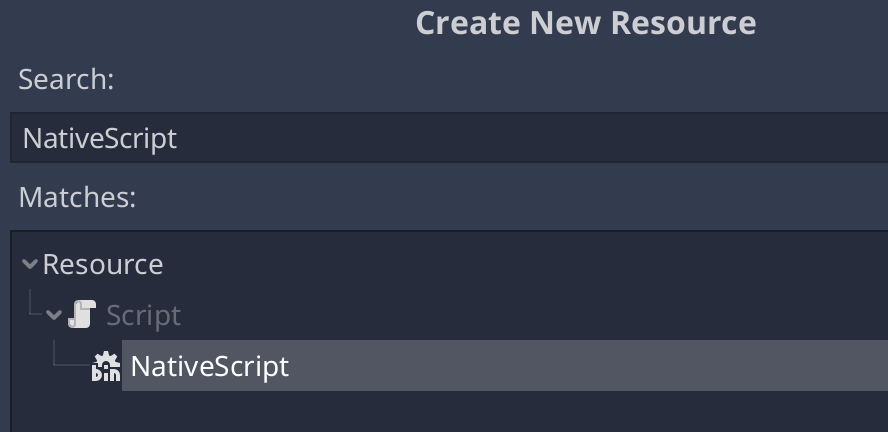
As you can see this is a NativeScript resource, to match what I did name this game_state.gdns. This actually comes back to bite us later, as I didn't like the name globals and so I changed it to game_state. Turns out that later we'll have a name collision caused by this.
Now we configure the new NativeScript to point at a class in our Rust library. We do this by selecting the NativeScript resource we just created and looking in the Inspector. We need to set the class name to GameState and the library to rust_library.tres. Again you must hit save! to update the resource file.
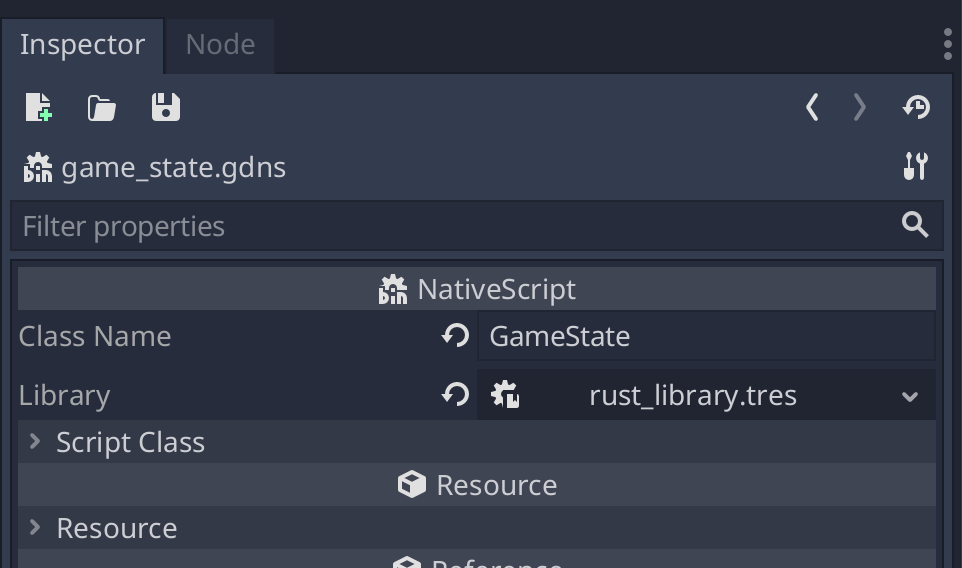
So where a standard GDScript resource is just a file in the file system with GDScript code in it, a NativeScript resource is a lookup that says where to find a class in a library. You can actually open game_state.gdns if you're curious. Now all of this configuration is pointing at …nothing. We don't have a class in our Rust library yet, and there's still one more thing we need to do.
Setting up A Singleton
The original tutorial creates globals as a Singleton, and I'm trying to match the original tutorial as close as possible. Therefore we'll need to have our resource AutoLoad on the game's startup. In Project->Settings go to the autoload tab, and add the path to res://game_state.gdns. You should use the browse button and select the NativeScript resource to make sure you get it right. Name the node rustGameState - not globals - so that the original code can live simultaneously with the new code for now. Make sure you check the Singleton box too.

Everything is now ready for you create your first Rust class.
Linking Godot to Rust
You'll be exposing a GameState class in the Rust code to start, and before you can do that you need to expose the built library itself so Godot can access it. First open up the lib.rs file in your Rust project. You'll replace the existing code with the following:
use gdnative::*;
mod game_state;

fn init(handle: gdnative::init::InitHandle) {
    handle.add_class::<game_state::GameState>();
}

godot_gdnative_init!();
godot_nativescript_init!(init);
godot_gdnative_terminate!();
This code won't compile yet - it's boilerplate you need to get GDNative up and running, but it pays to go through it closely. Starting with:
use gdnative::*;
mod game_state;
The first line brings all of the gdnative library into the current scope. Some tutorials say to use extern crate here, but that's dated as the latest versions of Rust encourage the use syntax for external crates. The second line brings in the game_state module from the game_state.rs file in this project. No you're not crazy - we haven't created that file yet.
fn init(handle: gdnative::init::InitHandle) {
    handle.add_class::<game_state::GameState>();
}
The init function is called by Godot the start of the program, and in it you expose all the "classes" that Godot needs to use directly. So if something is going to be referenced in a NativeScript resource, it needs to be added here in the init function. You'll note that even though we use the syntax game_state::GameState the class is available as GameState in the Godot program itself, matching the name of the class in the resource we created. Not to be confused with rustGameState which will be the name of the singleton instance. Every struct we eventually export will be listed here, so that Godot can find it.
godot_gdnative_init!();
godot_nativescript_init!(init);
godot_gdnative_terminate!();
Finally these macros effectively wire the entire library up. You can look up the docs for them but it's not worth worrying about it too much - it's boilerplate. You do need to make sure the init function is listed in godot_nativescript_init!.
Now we need to create a module in the lib directory named game_state.rs.
Exposing GameState
Finally an actually class! The GameState starts with creating the struct and exposing it. Let's start with what globals.rd has in it again:
extends Node

var currentStage = 1
var kills = 0
Well we can't do that in Rust. Godot wraps every script file in a kind of hidden class/struct, and we can make that more explicit here in Rust:
use gdnative::*;

#[derive(NativeClass)]
#[inherit(Node)]
pub struct GameState {
    kills: u16,
    current_stage: u16,
}
We start by bringing in the gdnative module. I'll be using * throughout for ease of use, but in the future I'll probably start explicitly binding just the names I want.
The struct has two annotations, #[derive(NativeClass)] does the magic that lets this struct be used in Godot. The second annotation is Godot specific and maps to the extends Node in the GDScript code. You'll want to make sure this matches so that your exposed functions are passed the right node type. If you build now you'll get an error like:
error[E0599]: no associated item named `_init` found for type `game_state::GameState` in the current scope
 --> src/game_state.rs:3:10
  |
  | #[derive(NativeClass)]
  |          ^^^^^^^^^^^ associated item not found in `game_state::GameState`
Every NativeClass type needs an associated _init function that returns Self. You can do that with an impl. Let's add that now:
#[methods]
impl GameState {
    fn _init(_owner: gdnative::Node) -> Self {
        GameState {
            kills: 0,
            current_stage: 1,
        }
    }
}
Don't forget the #[methods] annotation. At this point the code should build, and technically speaking it works. It just doesn't do anything, because the GDScript is still using the original globals code.
The globals code directly accesses kills and current_stage and updates it in place. I originally tried to mimic that in the Rust code, but I couldn't find a way to get GDScript to access fields on the struct directly. I'm sure it's possible, but since I'm intending to replace all the code anyway I went ahead and added methods for updating it.
 impl GameState {
    /* ... */
    #[export]
    fn reset(&mut self, _owner: gdnative::Node) {
        self.kills = 0;
        self.current_stage = 1;
    }

    #[export]
    fn current_stage(&self, _owner: gdnative::Node) -> u16 {
        self.current_stage
    }

    #[export]
    fn kills(&self, _owner: gdnative::Node) -> u16 {
        self.kills
    }

    #[export]
    fn advance_to_next_stage(&mut self, _owner: gdnative::Node) {
        self.current_stage += 1;
    }

    #[export]
    fn increment_kills(&mut self, _owner: gdnative::Node) {
        self.kills += 1;
    }
Note how every method is annotated with #[export], except _init. This is so that they can be called from your GDScript code. The second thing to note is how every method takes self (naturally) and an _owner. That _owner is the Godot Node that the script is attached to. None of these methods use the _owner, and indeed when we have ported all the code to Rust we won't need to actually export any of these methods or take the unused _owner parameter. However if you expose a method with #[export] and don't have that second parameter, you will get the compiler error:
error: no rules expected the token `self`
  --> src/game_state.rs:26:23
   |
26 |     fn current_stage(&self) -> u16 {
   |                       ^^^^ no rules expected this token in macro call
It's befuddling, and cost me hours many times, so make sure you add that field even if you ignore it.
Remember every method called from Godot (except _init) will need to have the #[export] annotation, and will take an owner parameter. The _ on owner is not important - I used to signify that it wasn't actually being used here.
Using GameState in GDScript
GDScript accesses the Singleton(s) in the codebase by name. If you look in GameScene.gd you'll see in its _ready() function this:
func _ready():
    var labelText = "Stage " + str(globals.currentStage)
Assuming you rebuilt the Rust project and correctly wired up the library, NativeScript class, and the AutoLoad as detailed above you can replace globals with rustGameState.
func _ready():
    var labelText = "Stage " + str(rustGameState.current_stage())
Note that current_state() is a function on the rustGameState as opposed to a field. If this works then you'll be able to build and run the game. It will always show "Stage 1" because you haven't replaced globals with rustGameState everywhere its needed.
I'm not going to go through all of those replacements. When it's complete the variable globals won't exist anywhere, instead reading/setting the same values rustGameState. Finally you can remove globals from the AutoLoad tab in Project settings, and delete globals.gd.
Porting Bullet
Add Bullet Script to Godot
Now that we've ported the global game state we can start working on any one of the scripts. I chose Bullet next for no particular reason, other than it's fairly small. You'll need to start by creating another NativeScript class resource, make sure it refers to the Rust library and has the class name Bullet.
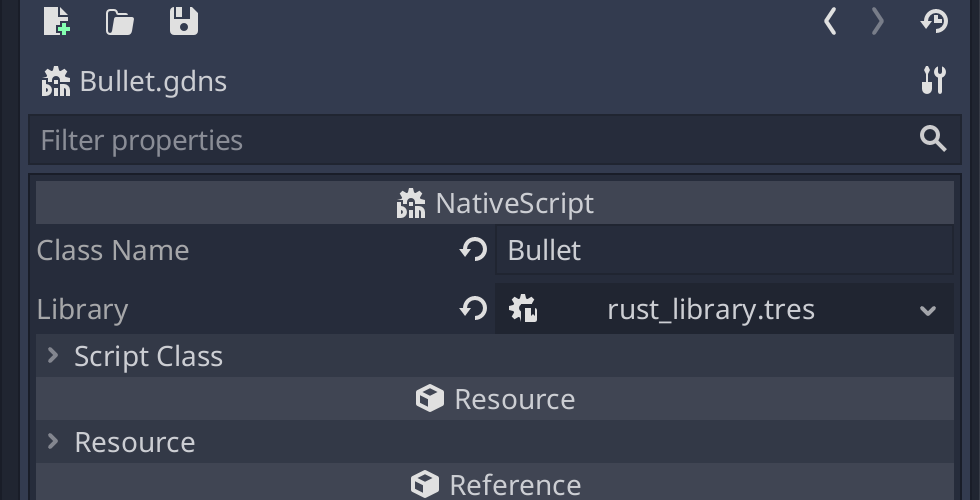
Make sure you save it!
Next you'll want to open the Bullet scene (Bullet.tscn) and open its BulletRoot in the Inspector. Set its script file to your new resource (Bullet.gdns). This will break Bullets, as they won't have any code operating them anymore.
Expose Bullet "class" in Rust
To start you'll need to update lib.rs to export a Bullet class. Those changes are small;
/*...*/
mod bullet;

fn init(handle: gdnative::init::InitHandle) {
    handle.add_class::<bullet::Bullet>();
    handle.add_class::<game_state::GameState>();
}
You add the bullet module - which doesn't exist yet - to lib so it can be accessed and then expose it to Godot via the handle.add_class function. From now on I'll just direct you to add the new structure to the library, so make sure you understand this part. One of the most common mistakes I made was to spend the time porting a GDScript file to Rust, only to forget to add it here and have no idea why anything worked.
Port the Bullet Code
The code we're porting is available here. It will be a little longer in Rust, actually that is a recurring theme, so let's start by just getting the class exported so this code will compile.
use gdnative::*;

#[derive(NativeClass)]
#[inherit(Node2D)]
pub struct Bullet;

#[methods]
impl Bullet {
    fn _init(_owner: gdnative::Node2D) -> Self {
        Bullet
    }
}
As before we derive from NativeClass, but this time we extend Node2d because that's what the Bullet is. Even though the Bullet doesn't have any data we still need a structure and an init method, so that Godot has something to grab onto.
Bullet has two methods: _process which actually makes the bullet move, and _on_Area2D_area_entered which handles collisions. Let's do those one at a time. First we'll add _process so we can see the bullets again.
impl Bullet {
    /*...*/

    #[export]
    unsafe fn _process(&self, mut owner: gdnative::Node2D, delta: f64) {
        owner.move_local_x(delta * 400.0, false)
    }
Despite the one-line nature of this function in GDScript there's a lot going on here. First where GDScript does not explicitly use the &self we have to, since this is Rust. The second is that the second parameter of owner is now being used so it's no longer _owner. Why is it used? Because in GDScript the extend directive makes all the methods on the Node2D object directly callable. Rust doesn't support that kind of inheritance. So whenever you see this:
func _process(delta):
	move_local_x(delta * 400)
you need to replace that with a call the owner. Unless the function is actually defined in Rust or a method written in a Rust implementation by you, it's probably really brought in by the owner object. So in the Rust code when we want to move_local_x, which is a method on Node2D, we need to call that on the owner object. This means the owner is being changed, and needs to be declared a mut parameter. Finally we have the original delta parameter, declared as a 64 bit float. I'm not 100% certain f32 couldn't be used here without errors, so I went ahead and used 64. The game is small enough that I'm not currently counting bits.
We're still not done with the function definition, you'll notice it's unsafe. Unfortunately almost all calls to Godot code are inherently unsafe, and you'll see that by straight porting this code (as opposed to writing a more Rust-like implementation) I give up a lot of safety. In a larger program I'll work to separate the safe code from the unsafe code, but that's an exercise for the reader.
Now let's look at the actual one-line function I implemented. You'll see that move_local_x takes 2 parameters in Rust, but one in GDScript. That's because Rust doesn't support default parameters, but GDScript does. If you look at the docs for Node2D you'll see that the default value for the second parameter is false so I pass false here.
If you compile this code you should see the Bullets move across the screen again. They won't hit any of the enemies however, so let's add the collision code.
impl Bullet {
    /* ... */
    #[export]
    unsafe fn _on_area2d_area_entered(&self, mut owner: gdnative::Node2D, area: gdnative::Area2D) {
        if area.get_collision_layer_bit(2) {
            owner.queue_free();
        }
Most of what applied before applies now. The first two parameters are &self and mut owner, and the function is unsafe. The third parameter is the Area2D object that the signal comes from. Figuring out type info can occasionally be tricky, but you can usually get it by finding the object sending the signal in the Godot UI.
Finally the last change from GDScript is queue_free needs to be called on the owner not self or as a global function. If you build the code and run the app you'll find that bullets….still don't hit their targets. That's because you need to update the Signal.
Update the Signal
In the Godot UI you can specify a Signal is emitted by the Area2d node when it is entered. That's found in the Node tab when you click the Area2D node in the UI for the Bullet scene. If this is foreign to you, you should probably go back to the original AirCombat tutorial and look through that example again, as that kind of Godot knowledge is outside the (increasing) scope of this tutorial.
The Signal is currently set to _on_Area2D_area_entered but that's the name of the function in GDScript. We renamed it _on_area2d_area_entered in Rust code to fit with convention, and we need to update that here. Recreate the signal so it looks like this, with the method name downcased.

Make sure the script you are connected to is BulletRoot. I flubbed this several times, so it is worth mentioning. Build and run the code and you should see Bullets hitting enemies again. You can delete bullet.gd.
Key Notes
Considering there were - what 3 real lines of code - we had to understand a lot to port the Bullet script. Let's reiterate them.
- Unsafe Anything that calls into Godot is going to need to be unsafe. For the sake of this tutorial I've made no effort to separate safe from unsafe code, so at the end most of the code will be unsafe. This won't be how I structure my next project.
- Owner GDScript uses a kind of inheritance so that methods called on the Node the script is attached to don't require specifying the Node, called instead like they are methods on the script. Rust requires you to explicitly take an owner, which will often be marked as mutable.
- Default Params Rust does not support default parameters. You'll have to look those up in the Godot docs, and perhaps make helper functions for them.
A Note About Docs
The API docs for godot-rust are comprehensive but Rust-centric, by which I mean they tell you all the new Rust information you need to know to use the functions, but assume you're already familiar with the Godot docs. So if you want to know how to call Node2D methods from Rust you'll look in the Rust docs, but if you want to know what they do you need the Godot docs.
Fortunately the godot-rust docs have a link on every page to the corresponding Godot API docs. This is extremely useful in part because the godot-rust search is much better than the search of the Godot API docs. So I recommend searching godot-rust first, and then following the link when you need to find things like default parameters.
Porting TitleScreen
The next script to port is TitleScreen which I once again chose because it wasn't particularly large. There's two things here we haven't done before, changing scenes and accessing the Singleton for the GameState. I'll also stop taking you through some of the things we've done in detail, since you can go ahead and re-read the directions above.
Prepare Class
Start by working through the boilerplate.
- Add the new TitleScreen struct to
lib.rsso it's exposed. - Create a new
title_screen.rsfile in lib. - Create a new NativeScript resource in Godot referencing TitleScreen.
- Make sure the "Control" node in TitleScreen is attached to your new NativeScript resource instead of
TitleScreen.gd.
Getting Global State
The TitleScreen struct is an empty type, deriving Node, so the initial setup is small:
use gdnative::*;

#[derive(NativeClass)]
#[inherit(Node)]
pub struct TitleScreen;

#[methods]
impl TitleScreen {
    fn _init(_owner: gdnative::Node) -> Self {
        TitleScreen
    }
}
It's the next function that is going to cause us to do a lot of typing, that is the ready function in the GDScript.
func _ready():
	rustGameState.reset()
We can't reference rustGameState in our Rust code the way that GDScript can. We have access the root Node from the Node tree, and then find the rustGameState class. We also have to convert into a Script "instance" so we can call reset on it. That last part is confusing so we'll work through the code, where it should become clearer. Let's start by getting the rustGameState Node.
#[methods]
impl TitleScreen {
    /* ... */

    #[export]
    unsafe fn _ready(&self, owner: gdnative::Node) {
        let rust_game_state = owner
            .get_tree()
            .and_then(|tree| tree.get_root())
            .and_then(|root| root.get_node("./rustGameState".into()))
    }
}
The _ready function is just like any of the other exports in a GDScript program, it's just called automatically instead of being wired to a Signal. We start by getting the tree off of the owning Node. In GDScript we'd call get_tree() but of course we can't do that in Rust, instead using the owner parameter.
This concept is important so I'm going to reiterate it. In Godot when a Script uses the extend syntax it inherits all the methods on that Node type, and is able to call them as if they are methods in the Script itself. However the Script and the Node are still separate objects, and this is just a convenience GDScript can provide. Rust doesn't support that so any method you are calling on the Node you're extending must be called on the owner parameter.
Managing Null
In this code we call get_tree on the owner, which in Rust returns an Optional<SceneTree>. This is one of the philosophical difference between Rust and GDScript. GDScript has the concept of null, and in the codebase we are porting the strategy is to just call methods on anything that could be null and crash if it isn't present. In Rust we aren't really allowed to do that, although you'll see sample code that just uses unwrap constantly, I tried to write this Rust in a way that's a bit more Rust-like.
To that end I chain and_then while navigating the Godot SceneTree. I haven't decided on the best approach yet for handling nulls in godot-rust, and for this exercise we're going to adopt a very noisy approach so that it's clear what we're doing.
Continuing here we get the tree off of owner and if it's present (it always will be) we get its root node with get_root. Now that we have the root of the SceneTree we can find the rustGameState object using the get_node function, and passing it a NodePath. In GDScript you'll frequently find Nodes in the tree this way, but using a string literal. The get_node function expects a NodePath type, but fortunately the godot-rust bindings provide a standard converter, so we can use the into function to avoid noise.
Our _ready function isn't finished yet. rust_game_state is now set to the Singleton Node rustGameState, but we need an instance of the Script.
Converting to An Instance
The rustGameState Node we just retrieved doesn't have a reset() function on it. That's because it's a Node but we need the attached Script instance. In fact when we reference rustGameState in the GDScript codebase we're actually referring to its Script, not the Node. Fortunately godot-rust gives us a way to access the Script Instance. Let's update the code.
use crate::game_state;
use gdnative::*;

#[methods]
impl TitleScreen {
    /* ... */

    unsafe fn _ready(&self, owner: gdnative::Node) {
        let rust_game_state: Instance<game_state::GameState> = owner
            .get_tree()
            .and_then(|tree| tree.get_root())
            .and_then(|root| root.get_node("./rustGameState".into()))
            .and_then(|node| Instance::try_from_base(node))
            .expect("Failed to get game state instance");
At the top of the of the file we've added use statement for the game_state module, so we can reference game_state::GameState. Then we've added a type annotation to the rust_game_state:
let rust_game_state: Instance<game_state::GameState> = owner
Next we've chained our and_then calls and added the Instance::try_from_base(node)) call. What this does is takes the Node "base" and tries to convert into an Instance, which is a template type in godot-rust. An Instance is a reference to a GodotObject with a NativeClass attached. That NativeClass is the GameState struct we wrote. We have to annotate rust_game_state so that try_from_base can make the right conversion.
Finally cap it off with an expect and a custom error message. We could use unwrap here too, but the Rust Book discourages that.
Calling Reset
We still haven't called the one line reset function! Rust is not going to compete with GDScript on conciseness, that's for sure. It's not quite as simple as calling reset on the instance, as the Instance wrapper can't just delegate reset to the type it includes. Instead we'll use one of the methods on Instance, in this case map_mut, to access the script and call methods on it.
Right after you set rust_game_state we add the following.
        rust_game_state
            .map_mut(|gs, o| gs.reset(o))
            .expect("Could not reset game state");
The map_mut function on Instance takes a closure with two parameters, the Script object, and the owning Node. Now, FINALLY, we can call reset on the Singleton GameState. We are using map_mut here because reset mutates the object. The expect is required because map_mut returns a Result type. In the future I believe much of this noise can be cleaned up by moving Rust much of the code into functions that return Results and use the ? operator, but we'll avoid that now because too much abstraction can make it harder to follow along.
We have now ported the entire _ready function from GDScript to Rust.
Changing Scenes
Changing Scenes in Godot is easy, get the tree and call change_scene. The same is true in godot-rust but much as before we have to be a little more explicit. We'll add the following method to the TitleScreen implementation.
    #[export]
    unsafe fn _on_newgame_pressed(&self, owner: gdnative::Node) {
        if let Some(tree) = &mut owner.get_tree() {
            tree.change_scene("res://GameScene.tscn".into())
                .expect("Game Scene could not be changed!");
        }
    }
_on_newgame_pressed is just the function name we used in GDScript, only with lowercase and underscores to match Rust convention. Like other exported methods it takes self and the owning Node. It's unsafe because we call methods on owner in it.
The first line uses the if let syntax of Rust to get the tree if one is present. Note that I get a mutable instance of the tree, because changing scenes mutates the tree. Finally I add the expect because the change_scene method returns a Result.
Quitting the Game
Quitting the game is the similar to changing the scene. You just don't need the additional expect because quit doesn't return a result. Like other functions quit in GDScript has a default parameter, and we need to pass that explicitly here (-1).
    #[export]
    unsafe fn _on_quitgame_pressed(&self, owner: gdnative::Node) {
        let tree = &mut owner.get_tree().expect("Couldn't find scene tree!");
        tree.quit(-1);
    }
In this case I used expect instead of if let to pull the Tree object out of an Option type, for no particular reason other than I haven't decided how I prefer to handle Option types yet.
Rewire Signals
Finally you'll need to go back into Godot and rewire the Signals on the NewGame and QuitGame buttons respectively, as they still point to the old GDScript function names. Once you do that you should be able to play the game again, as NewGame and QuitGame will both work again. A that point you can remove the TitleScreen.gd file.
Key Notes
Despite the "small" size of the TitleScreen it ended up being significantly more difficult than expected. However we've covered quite a few concepts that you'll need for writing godot-rust games.
- Global State - Global State is traditionally accessed via the Singleton/AutoLoad in Godot. We can't just use the name like GDScript can, and instead need to get the Scene Tree, find it's root, and then find the attached Singleton Node. Throughout this codebase I copy/paste retrieving the global state. In your code you should probably extract a method, but I find that confusing for following a tutorial.
- Found A Node - Finding a Node in Scene Tree by its Path works the same way as GDScript, it is just more verbose because you need to convert the NodePath to a String (with
into()) and you need to manage theOptiontypes that are returned by manygodot-rustfunctions. - Calling Code In Other Scripts - To call code in other Scripts, which is what we did here when we called a method on
rustGameState, requires using theInstancetype ingodot-rust, and themapfunctions to make those calls. It is more type-safe than GDScript at the expense of being more verbose. - Handling Null - GDScript uses null extensively, relying on exceptions to handle when an object isn't present. Rust does not allow that and instead uses
OptionandResulttypes to handle failure. While this approach is usually preferred in larger systems, mapping from GDScript to Rust can be tricky because of it.
Time For a Break
We've done a lot, in fact we may have covered enough that you can complete the rest of the port on your own. I'd encourage you to try, and stop if you get stuck. Part two will be ready soon, and we'll pick up with Player.gd.